Thursday, March 17, 2011

a bit of spring crafting

I've been meaning to post about my current crafts, HOWEVER... my camera decided to poop out.  They say that a picture is worth a thousand words, but I doubt I can craft an entry with 10,000+ words that will adequately express the things I've made (or that the mistakes that I've made...)

So first off, I hate making things I know that will not be used... Seeing how I've been uninspired in quilt making, I've been looking around the apartment to see what things are needed. I see some really ugly oven mitts/trivets/hot pads that are hanging in their usual place. And by ugly I mean *ugly* and old and well used. So I set off to make us some new ones.  The first one turned out pretty good...


I went with a simple pinwheel design and played with the different decorative stitches on my new machine.  I was quite proud of it. So it's been hanging there when the Husband came home, and I proudly showed my my creation.  He then told me it was nice in that tone that says "it's nice, but I don't like because X. But, I'm not going to say anything because I might end up with my dinner tasting like a salt mine."  I choose to ignore him.  after a day or two of looking at it, it begin to bother me as well. I couldn't put my finger on it until (!!!) I realized how weird looking it is to have the sashing fabric the same as part of the pinwheel. Then I saw what my husband saw. IT LOOKS LIKE A SWASTIKA!!!! Yeah, once I got it in my mind, I can't get it out. I can't have that hanging on my wall (actually it's still there, it's not an actual swastika, and ppl can't see it until I point it out...) The next day, I went to Joann's and luck would have it, their collegiate line of fabric is on sale. I then set out to make a new set. 


Now, instead of pseudo swastika looking pot holders, we have UT ones (go longhorns!) The Husband def likes this set better than the last. 

I then moved on to another project, quite a few weeks later because I've been wasting my time on some video games... (I won't go into specifics about my geekiness, just know that it took up *a lot* of time...) I saw some patterns for wallets on craftster.org.  (and this has all stemmed from an odd, non-biological clock related urge to make diaper bags) I've been working on patterns from that darn kat and confessions a fabricaholic.  I have yet to make one that is satisfactory... The following are three versions of the wallets and one that I made up because I got fed up trying... 


Version 1: First try, following the pattern from Confessions of a Fabricaholic. As you can see, the zipper pocket was way too small. That was mistake #1. I accidentally used the wrong piece of fabric for it. By the time I noticed, the pocket was pretty much done. So I figured I'd just leave it alone and watch out for it on my next try.  Over all, the design of the pattern is nice, but there is soooooo much bulk on the seams.  Also, this may just be my own fault, but the fusible interfacing I used was not stiff enough.  The entire wallet was just... limp.. So after taking note of my mistakes, I went to the store to get a stiffer interfacing and on to version 2...


Version 2: So I got some super stiff interfacing.  This, in turn, added even more bulk making it really hard to turn.  I tried turning the wallet three different times, but had to take the wallet apart each time because it was stretching the outer fabric and bulking the edges that makes it really hard to top stitch around the edges.  So I decided to bind the wallet instead of turning it.  Good stuff: the zipper pockets and the credit card pocket are well constructed. (I'm getting better at zippers!)  Bad stuff: I couldn't find a good way of attaching the flap.  I did the only thing I could... I cut open binding where I wanted to insert the tab.  That resulted in this:

 You can clearly see the raw edge and it is ugly...

 After two tries at Confessions of a Fabricaholic's pattern, I took a short breather and became a couch potato for a few days... Then I moved on to That Darn Kat's pattern.  Her construction of the CC pockets seems to add less bulk to the edges.  I replaced one of the sets of CC pockets with a zipper pocket. And here is wallet, version 3:


 Version 3: At a glance, the wallet looks fine.  However, upon closer look, this wallet is also riddled with mistakes and poor craftsmanship... Boo :(


The top stitching is not straight... and it is painfully obvious when compared to the straight quilting...


Also, there is something up with the top stitching around the zippers. I think it's because of the folding of the zippers... So after three unsuccessful attempts at making a bill sized wallet, I decided to make a folding wallet on my own design.  


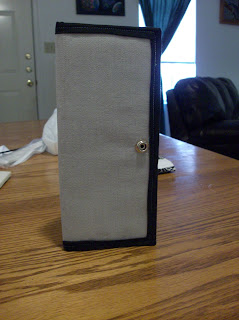
Wallet 4: Overall, I feel that this wallet is okay. No major, obvious mistakes.  The stiffness is nice without adding too much bulk.  If you ignore the uncut thread ends, There are only 2 things wrong with his wallet.  First, the wallet is too wide, it needs to be about only 2/3 of the length. The second thing is this:


Notice how there are zipper teeth on this pocket but no actual zipper? Yeah... I accidentally ripped it out when I putting it all together... 


So here it is... all the things I've done recently. I feel like I've done a lot of stuff but without anything to actually show for it. It's okay though, I have a huge stash of fabrics to work with AND I just bought over 100 zippers on ebay for about $20. So lots of material to make my perfect wallet!!!! 


Thursday, February 17, 2011

a brief return from an involuntary hiatus...

Let me explain my current situation, and why I've been away. It's like a series of unfortunate events. Well, maybe not unfortunate just untimely.  So the hiatus started with the holidays. With the cooking and prepping and etc, I've just been too busy to make anything.  Thus, nothing really to put on this blog. THEN... the new year came and I was hoping to have some time to make stuff.  Alas, it wasn't meant to be. The Husband and I moved because of his job, to a smaller town and to an apartment with no spare space for crafting.  Even if I wanted to make stuff, I ran out of projects. I've been so uninspired.  I have crafter's block. ::sigh:: The things I make all have utility.  I hate making things I can't use or won't be used.  Example: I was going to make these new pillow covers; however, I'm scraping that project because I realized that we don't use any pillows on the couch.  Any pillows will eventually find their way to the floor where my dog will snuggle up to it and cover it in dog hair.  ::sigh, again::

Well, I'm hoping things will look better soon because 1) I ordered a new sewing machine with more features I can play with!  I've decided to go with the Brother CE5500PRW because I can't justify getting a more expensive sewing machine with my basic skills.  2) I've also got new fabric in pretty spring colors. I'm hoping the brighter colors will inspire me to make something awesome.  3) I've picked up crocheting again.  Seeing the limited space I have at our new apartment, it is the only logical thing to do.

As this is my first post in a while, I can't just leave without posting something cool.  And here it is.  A lot of the yarn I work with are "recycled" yarn.  This just means that I run around thrift stores looking for old sweaters in good condition to take apart and use the yarn.  This is also the reason why I have a ton of yarn; the price to yardage ratio is so much lower.  One of the downsides of getting my yarn this way is the color.  There really isn't that big of a selection.  So what is a girl to do?! Dye them I say! Whenever I find wool sweaters that are really light in color, I just snag them up because they are the easiest material to dye.  All you really need is Kool-aid or food coloring and vinegar.

So here is a section of the sweater I took apart

 As you can see, it is this really drabby green color, but it has potential.  The yarn is made up of 3 strands of off white color and two strands of dark green.  So when I dye it, the lighter colored strands will pick up most of the colors. But before I can color the yarn, I have to take the sweater apart.  

 And here it is... This is the deconstructed yarn from that section of sweater. 

Next, we'll need to prep the yarn for coloring.  Fill the kitchen sink (or bathroom's or just a bucket) with lukewarm water and stir in a bit of shampoo.  Soak the skein of yarn in the water, taking care that the yarn is completely submerged and all the air bubbles are released.  Stir the yarn around a little bit and lightly wash the yarn.  However, DON'T WORK THE YARN TOO MUCH!!! The yarn will felt together if it's over worked.  

Now, we'll make the color solution.  In a non-aluminium pot, put enough water to submerge the yarn.  For every 2 quarts of water you put in, add half a cup of vinegar (if you're going the food coloring route).  At this point you might be wondering why I putting in vinegar to dye yarn.  The reason is that the acid sets the color.  You can also use lemon juice if you don't like the smell of vinegar.  If you're going the Kool-aid route, then you don't need any acid since there are already enough of that in each packet.  However, do make sure that you use the the non-sweetened, non-carbonated kind (basically the cheapest kind you can find).  Then comes the colors!!!! Mix your food coloring in a glass (you can also use Wilton's Icing Color because there is a wider color selection) and dump it in the pot.  With Kool-aid, just directly dissolve the packets in the pot.  (Side note: you can experiment with the colors by combining these two different methods.  If you add Kool-aid, you can forgo the vinegar.) Make sure the colors are even distributed in the pot.  Then put in the yarn, completely submerging it in the solution.  Let it just sit there for 5 min or before turning on the heat.  

So now turned on the heat to medium low.  You want the solution to be hot, but not boiling.  Easiest way to tell when the water is at the right temp is when you see a bit of steam coming up from the pot.  It is REALLY REALLY important that the water is not boiling because 1) the wool will felt and 2) you might burn the yarn that's sitting at the very bottom.  Check on your yarn every 20 mins or so.  The yarn has absorbed all the color when the water turns clear.  After the water turns clear, turn off the heat and let it cool off.  Do NOT immediately take out the yarn to rinse.  The sudden change of temperature will felt the yarn.  So let it cool off before rinsing the yarn.  

Not sure if you can tell, but the water has turned clear and the yarn is dyed.

Then take the COOLED OFF yarn and rinse it in lukewarm water.  If the yarn is feeling kinda scratchy, add a bit of hair conditioner in your rinse and rinse again in clean water.  Then squeeze, not wring, the excess water and hang it to dry.  


As you can see, here are two colors that I was working on today.  The darker strands of the original yarn and the newly dyed lighter colored yarn has a nice contrast.  I'm loving the transformation from that dark drabby green to these two bright colors.  Only if I knew what to make with them... 

Here are some mistakes that I made when I tried out this method.  So please learn from them and may your first skein of awesomely dyed yarn be awesome!

  • If you don't put enough colors in, the end result may come out splotchy.  
  • When tying the skeins of yarn together, don't do it too tightly because you will end up with a tie-dyed effect... 
  • You might want to wear an old or dark colored shirt because you will splash colored water on yourself... 
  • If you splashed some of the colored water on the floor or counter, clean it up before it dries; it just might stain if you don't


Monday, November 22, 2010

Thanksgiving planning

This is the first Thanksgiving that I will be cooking for my husband's family.  (By family I mean his mother) We'll be driving up to Tulsa, OK from Houston to visit his mom and I am in charge of the cooking.  I don't really mind it, actually I'm relishing the planning and showing off my cooking.  Everything is planned, I just need to figure out the timing issue to make sure everything is nice and hot and nothing is over/under cooked.  My husband made only two requests: 1) have ham at the table and 2) have twice baked potato at the table.  Everything else is up to me. Here is what I have planned:

1) Ham, the fully cooked kind that comes with a glaze
2) Chicken, brined and roasted (I know it's a bit excessive to have two proteins but it just doesn't feel like Thanksgiving unless there is a bird involved) and brown gravy from the drippings
3) Stuffing, the kind from a box, but with lots of additions
4) Green bean casserole, recipe from Pioneer Woman, slightly tweaked to my liking (I would love to put some mushrooms in there, but alas, the husband has a strong dislike for mushrooms)
5) Twice baked potatoes, my own recipe (will post later with pictures :))
6) Corn tomato salad, I needed something that doesn't require cooking since the burners and the oven will be occupied
7) Yeast rolls, store bought, just need to pop them in the oven before serving

So it looks like a lot of work, but I think I can do it.  It's a good thing that the husband's mom likes leftovers because I will be cooking enough food to feed an army!  I shall hand the camera over to the husband during the cooking and hopefully end up with some pics I can share about the process... Wish me luck!

Friday, November 19, 2010

I think I'm a horrible blogger

... or that I'm just horrible at updating. I tend to get something in my mind and just run with it without taking the time to chronicling the process.  So on this find Friday morning, I saw my camera and *finally* realized that I haven't taken a single picture of my current project or the process. A while back i stumbled upon alamode's quilt as you go method.  Basically, you make quilt a bunch of smaller quilt sandwiches and then attach them to make a final big quilt.  I've heard many good things about this method since quilting a large quilt is pretty hard on a short arm machine. The past couple of quilts I put together always had fabric gathering on the back and (although minor) looked bad.  In an effort to improve my quilting skills and try out some new techniques, I set out on this venture.

I needed a design and I came up with a simple block pattern.


There are 6 different block designs, and with each design I used 4 different fabrics to create 5 distinct blocks for each design.  In total, there are 30 different blocks to be quilted to the backing and then put together.  I've already made the 30 different quilt tops, but didn't get a chance to take a picture of them before the battery in my camera died. :( I did get a chance to take pictures of some mistakes I've made. Hopefully you can learn from them...

So you can see the fabric puckering, a recurring theme in my quilting it seems... :( Then i realized that I was using the regular presser foot. 
... So I popped on the walking foot and voila! the entire thing is nice and smooth and more perfect than the last one! yay!
 I never realized the awesomeness of the walking foot.  I mean I read that it really helps when you have multiple layers of fabric, but my last quilt still puckered.  I think I'm just not pinning the sandwich smoothly. Will need practice on that.

As for the backing, I had some white on black fabric that I found in the remnants pile at Joann's that I can't find a use for.  So I thought it would make a nice pieced look with a common theme.

So here is one with pretty flowers.
And here is another one.  With this one, I decided to just follow the lines on the fabric pattern.


Which made an interesting pattern on the front. :)
I still have a huge pile of quilt tops to be quilted to the backs. I'm about to try some free motion quilting. The blocky design and the fabric pattern should make it "interesting."

Now, lets talk about quilt appreciation.  When I show my husband my newly finished quilt, his usual response is "oh that's nice." He doesn't really reach for a quilt when he's cold on the couch, he prefers to just put on another jacket and stick his foot under my butt. So I'm on the couch alone and is the only one that uses my quilt.  Then it got cold. My dog looked cold when she was chilling on the couch, so I put one of my first quilting tries on her. Now she's not so cold :).  I'm glad someone besides me appreciates and actively uses one of my quilts.

Monday, November 8, 2010

International Quilt Festival roundup

I know, I know... I've been meaning to post the pictures I took at the Quilt Festival earlier, but a series of random events have prevented me. (long story...) Soooooooo... I finally have the time today and I'm going to share with you what I saw.


This is one of the first quilts that caught my eye (and was able to take a picture of). I thought it was just "quaint" until I read the description and realized what it was made of.

It's made of selvages! This is as close as I could get to it.  It's just too cute... 

And this was a quilt right next to it. It's so pretty reminding me of Monet paintings that I used to stand in front of for hours at museums. 

From a far, this quilt doesn't really stand out *that* much from many other entries in the show. 

HOWEVER!!!! when you take a closer look, the quilt just pops at you.  It's so 3D  with the flower petals and the buttons! I love it. :)

And then something shiny caught my eye. 


I saw this quilt from across the room.  At first, I was attracted to it because I thought the green lines on the flower are made of stitches and quilting lines.  However, on a closer look, the lines are just a print.  This is that kind of quilt that the longer you look at it, the more interesting it becomes...

... for example, the ric racks used for edging. and the different fabrics used, and the quilting used to define each part of the quilt. 

I was on my way out of the exhibition part of the Festival, and I just *had* to stop and take a closer look at this quilt. It was one of the award winners, and I can clearly see why.  The fabric choices are pretty simple, but the quilting and the bead work is just *amazing*! 

Just look at the details! 

I would have taken like a million more pictures, but alas, my camera chose the wrong time to run out of batteries.  I was soooo excited to go, I completely forgot to check the battery level before I tossed my camera in my bag and ran out of the door.  I didn't get a chance to take pictures of the all the other awesome quilts at the vendor booths and all the cool quilting toys I saw. boo :( 

Anyways, moving on to my thoughts of the vendor floor.  There were so many amazing vendors with awesome things to sell; anything from the typical fabric, threads, and appliques to huge and industrial quilting machines, and foot massagers (odd, I know).  I wasn't in the market for any large tools so I mainly looked at all the fabric shops. I felt like a kid in a candy store.  I looked everywhere and touched everything. I was in heaven.  After taking stock of what was available, I took out my plastic and started shopping. 

So here is a fat quarter stack of Civil War Chronicles from Schoolhouse Quilt Shoppe  
A close up of the fat quarters


Here is a fat eighths pack of lavender Civil War.  I've been looking for some purple/lavender fabric for some time, and this pack is just awesomely pretty 


Here is a stack of random fat quarters

and a closer look at them :)

 So here it is folks, my first trip to the International Quilt Festival and I'm sure I'll be back next year. I will have a plan next year so I can better plan my time, and not just wonder aimlessly and touching everything. One thing I was disappointed about is the fact that I didn't see that many Japanese imported fabric.  I've been wanting to add some Kokka fabric to my stash, but I didn't see any vendors that was selling it :( ah well...

Thursday, November 4, 2010

Quilt festival, cont'

So, I have been meandering around the festival for about 2 hrs now. Spent the time split between the exhibitions and the booths. Since this is my first time, I didn't have any specific vendors I wanted to visit. However I did find and excellent array of fabrics being sold and some excellent tools. I think I'm about to call it a day. This event is huge and I think I walked most of the isles, but there is no telling! I took some pictures of some very pretty and inspiring quilts at the exihibition portion that I will upload when I get home. It's a shame that the prettiest ones have a "no photography" restriction. Also, my camera ran out of power before I got a chance to finish looking at the quilts. :(

My final thoughts and pictures should be posted in a few hours.

Quilt festival, first impressions

So I made it here! Quilting not being a young person hobby and I'm here in the middle of a weekday makes me one of the youngest people around (except for the few little kids dragged along by their mother). I heard that to fully experience this, you would need a game plan. I brushed this off and decided to walk around as my game plan. Boy was I wrong... Now I'm feeling like a lost kid in a grocery store.